Showing posts with label 99T. Show all posts

Sunday, August 18, 2013

Tamiya 1/20 Lotus 99T - 4

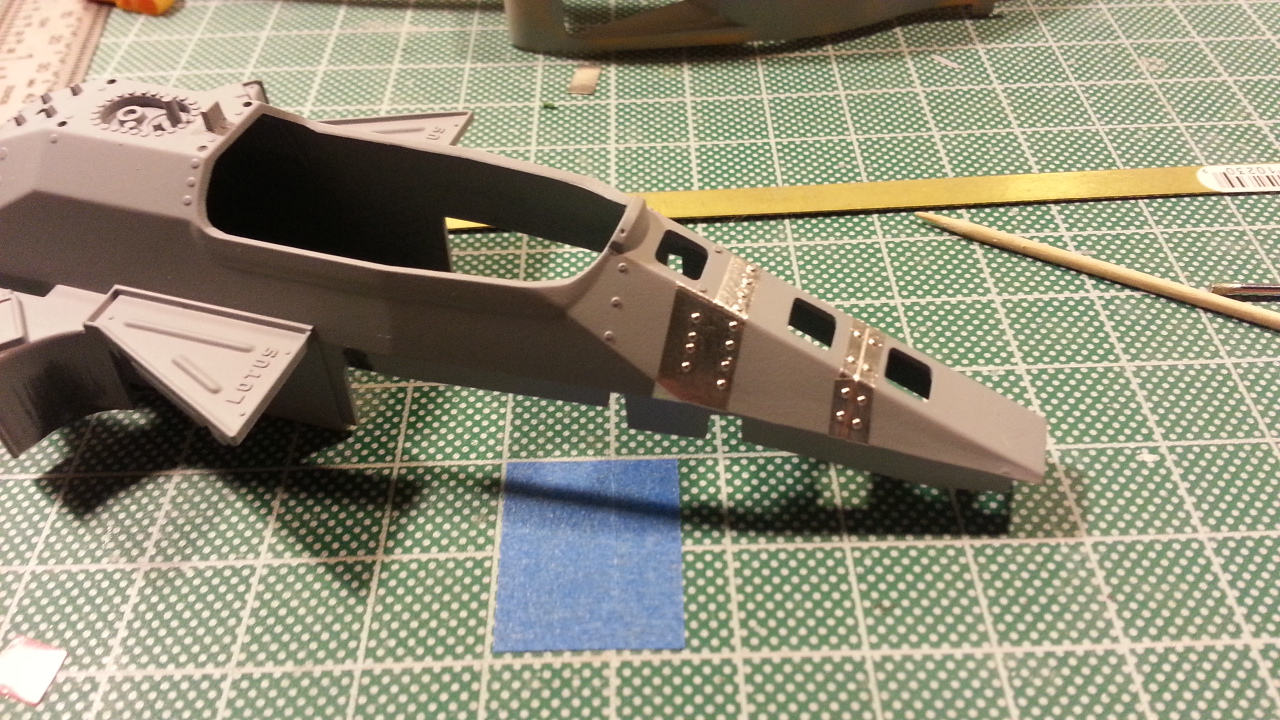
Managed to make some progress on the Lotus. The last couple of weeks, I'd been working on painting and decalling the monococque. In my last post I had managed to get it primered and start placing the bare metal foil to simulate the rivets. The next step after that was to paint it.

I applied a couple layers of Testors Gloss Black enamel. Because of the tooling process Lotus used to lay up the chassis, the monocoque is finished in a rough carbon fiber. I tried to manipulate the airbrush in such that the paint would create some texture to simulate the effect.

 Once the enamel had dried enought that I could handle it, I took some Tamiya cotton swabs dipped in enamel thinner and began rubbing the gloss black off the raised rivet details. Overall, I was happy with the way it came out. Some parts where the Bare Metal Foil was wrinkled up became exposed, but it's very minor. I'll probably just touch it up during final assembly and inspection.

I had originally planned to use aftermarket decals, but my impatience got the better of me and I went with the decals from my original issue Lotus. However, I had forgotten how thick Tamiya decals are. I spent the next week and a half using Micro-Sol to try and eliminate the decal film, but with little luck.


 Eventually, I decided the Micro-Sol had at least thinned enough of the decal that the clearcoat would eliminate it. I sprayed on three coats of Testors Lusterless (Flat) Cote. It managed to eliminate most of the film edge.  It's noticeable at some angles, but for the most part, I'm please with the result. I'm trying not to let the "perfect be the enemy of the good" as it were.


 Another angle. With the flat clearcoat, you can see how the raised rivet really stand outs. Another benefit of using Bare Metal Foil is that it's raised,  simulating the areas where the carbon fiber was laid over the chassis' bulkheads.

I also added primer/sealer to some other body parts, such as the front and rear wings, and the monococque sides. I'll be wet sanding those in preparation for another coat of  primer/sealer, and hopefully color coats before the end of the month.


Sunday, August 4, 2013

Tamiya 1/20 Lotus 99T - 3

Quick update for today. Managed to spray gray primer onto the monococque. The plan is to spray it gloss black, apply the decals, and then clearcoat with flat black.


You can see from this pic that I've started to put Bare-Metal Foil over the rivets. The plan is have the foil covering all the rivets on the tub, spray the black, and then use a Q-Tip dipped in thinner to expose clean away the paint from the raised rivet detail. It's a technique used for raised engine lettering and badging on car bodywork.

Also, I joined the Classic Plastic Model Club, and have to say my motivation has gone through the roof. I had a lot of fun at my first meeting, and I'm really looking forward to taking part in my first show in October.

Sunday, July 7, 2013

Tamiya 1/20 Lotus 99T - 2

Not much of an update for this week. Unfortunately, the current heat wave we're in coupled with humidity hovering between 70 to 75% limited the amount of airbrushing I could do. Since I don't have a paint booth yet, I'm relegated to doing my painting in the garage. On a 94 degree day, I'd be just as comfortable in an oven. 

However, before it got too hot, I did manage to lay down a coat of Primer/Sealer onto the Lotus' main body and front wing. Below, you can see the result after I wet-sanded the body with 800-grit 3M Wet and Dry sandpaper.


Hopefully, the heat will break sometime this week and I'll be able to add primer/sealer to the rest of the bodywork.


Sunday, June 30, 2013

Tamiya 1/20 Lotus 99T - 1

Alright, so my first kit in my "Back to Basics" approach will be this 1/20th scale Lotus Tamiya 99T. Believe it or not, that's an original issue Lotus 99T. Even has the original tobacco decals. This will be my one deviation from box stock. The original decals have yellowed pretty significantly, and the blue faded. So I'll be using aftermarket decals for the kit.


Tamiya kits have a well deserved reputation for going together fairly well and have a fair amount of detail. I also like the fact that it's one color, which will help me to focus on developing a consistent painting technique. Plus as an F1 lover, it's a subject that I thoroughly enjoy.

The bodywork is fairly straightforward. I glued the radiator ducting to the main body. 


This is one of those moments where it's ok to add more styrene cement than necessary. As you can see in the pictures below, when you press the pieces together, the excess cement will flow out of the joint. The cement will cause the styrene to "melt", welding the two pieces together, and voila, you've just filled the seam.


While waiting for the glue to dry on the ducts, I went and decided to tackle the rear wing. Since the entire rear wing assembly is one color, I decided it would be best to assemble it, and then paint it as one piece along with everything else. My biggest concern was assembling it in such a way that would allow the entire assembly to be square. Below is the parts breakdown.


The first step was to put a strip of double sided scocth tape onto a 90 degree angle plate. Then attach an end plate to the scotch tape


Then I took the upper elements, and glued it to the endplate, using a smaller machinist square to ensure it sits at 90 degrees to the endplate.


Next, I glued the main element to the endplate, placing the machinist square upright, but still using it to make sure all is squared up. A second square is used to support the main element while the glue dries.


Then glue the other endplate to the assembly. The mounting tabs and slots have a certain amount of play, so I used a machinist square across the top of the assembly to ensure everything is squared up.


A couple of views of the completed rear wing.


By this time, the glue on the radiator outlets had dried, and I sanded it down along with the rest of the body. I sanded it using 3M Fine Sanding sponge in preparation for the first coats of primer. I mocked up the rear wing with the body to give me an idea of how it will look and make sure it will sit correctly when fully assembled.


That's it for now. For next week, I hope to have it in primer and initial wet sanded. As always, any comments or suggestions is appreciated. Thanks!